Showing posts with label dessert. Show all posts

Wednesday, February 26, 2025

Panna Cotta


Panna cotta is one of the easiest things I've made but it makes a huge impact! The one above is topped with salted caramel sauce (I got this one in a gift basket) and an ungodly amount of caviar. But you can top it with just jam, fresh berries, macerated fruit or other items!

Panna Cotta
From Epicurious

1 7g packet unflavored gelatin (2 1/2 tsp)
2 cups heavy cream
1 cup half-and-half
1/3 cup (67g) granulated sugar
1 1/2 tsp vanilla extract

Sprinkle unflavored gelatin evenly over 2 Tbsp cold water in a very small saucepan; let stand to soften (about 1 minute). Heat gelatin mixture over low heat until gelatin powder is dissolved; remove pan from heat.

Bring heavy cream, half-and-half, and sugar to a boil in a medium saucepan set over medium-high heat, stirring often. Remove pan from heat and stir in gelatin mixture and vanilla extract (use a rubber spatula to get everything!). 

Divide cream mixture among ramekins and cool to room temperature. Refrigerate ramekins (covered with plastic wrap) at least 4 hours or overnight.

Sunday, March 31, 2024

Passion Fruit Mousse


We have a HUGE passionfruit vine in our backyard and it goes crazy throughout the year. I actually feel bad when I end up throwing some of them away because I know they're so expensive at the market. So I found this recipe for passion fruit mousse and I try to make it as often as I can. It needs a ton of passion fruit (like 20-25 of them, though you can use store-bought unsweetened passionfruit juice concentrate as well).


If you're using fresh passion fruit, prepare your 1 cup for the mousse by blitzing the pulp for a few seconds in a blender or Nutribullet. This loosens the membranes, which cling all the seeds together. Once blitzed, you can pass it through a sieve to get the juice. Use the back of a spoon to rub the seeds and push out as much juice as you can through the sieve. You should be left with a scoop-able spoonful of almost-dry black seeds once you're done. I did this in a few batches with the sieve directly on top of the measuring cup.

You'll have some bits of broken up seeds (which is totally OK by me) but if you're totally not into that, you can skip the blending and just push as much juice through the sieve as you can.


Passion Fruit Mousse
Adapted from Olivia's Cuisine

1 1/3 cups (290g) heavy cream, cold
1 can (397g) sweetened condensed milk
1 cup (265g) passion fruit pulp or unsweetened juice concentrate

1/3 cup fresh passion fruit pulp (with seeds)
3 Tbsp granulated sugar

Blend together the cream, condensed milk and passion fruit pulp in a blender for 3 minutes. Pour into dessert cups or ramekins (or small deli containers, as shown above). Refrigerate for at least 3 hours. Garnish with passion fruit topping; directions below).

In a small pan over medium-low hear, cook together the fresh passion fruit pulp and sugar together until the sugar dissolves. Continue to cook until topping thickens, about 2-3 minutes. Spoon evenly over the top of the passion fruit mousse. Cool to room temperature before topping mousse.

Topping can be made ahead of time and then refrigerated until needed. 

Tuesday, March 16, 2021

Blueberry Bundt Cake


This is a bit of a late post but behold my first bake of the year! Melissa Clark's blueberry bundt cake from the New York times. The cake was pretty dense but moist and the glaze was awesome. I felt like I was glazing a donut/doughnut (not that I've done that before).

It's a great cake if you have blueberries that are just getting a little too ripe because you cook them down for the glaze. In a pinch, you can always use frozen berries. And it's a huge cake so it'll last you the entire week! Make sure you use a bundt pan that's large enough, or use two loaf pans.

Blueberry Bundt Cake
Serves 10-12

3 1/2 cups (450g) all-purpose flour
2 tsp baking powder
3/4 tsp fine sea salt
1/2 tsp baking soda
1 cup (225g) unsalted butter, room temperature
1 1/2 cups (300g) granulated sugar
4 eggs, room temperature
2 tsp vanilla extract or bourbon or brandy
1/2 tsp almond extract
1 tsp nutmeg (optional)
1 tsp lemon zest (optional)
1/2 cup (120mil) sour cream
1/2 cup (120 mil) whole milk
2 cups blueberries (fresh or frozen)

1/2 cup blueberries
1 Tbsp lemon juice
2 cups (245g) confectioners/powdered sugar

Preheat oven to 350 degrees. Thoroughly brush the bundt pan with butter and then sprinkle sugar throughout, tapping out the access.

In a medium bowl, whisk together dry ingredients. 

Using an electric mixer, cream butter and sugar until light and fluffy. Beat in eggs one at a time, thoroughly mixing between eggs. Beat in the extracts/alcohol/nutmeg/zest in whatever increments you are using them in.

Add half the flour mixture, then the sour cream, then half the flour mixture and then the milk. Make sure you don't over beat. Remove bowl and use a spatula to fold in blueberries. Scrape into pan(s).

Bake for 50-60 minutes, until a toothpick comes out clean or with a few crumbs clinging - just make sure it's not wet. Take care not to overbake. Transfer to a wire rack to cool for 15 minutes, then unmold carefully and cool completely.

In the meantime, cook berries with lemon juice until berries burst. Use a fork to smush into a jam. At this point, you can strain it for a perfectly smooth glaze but I like it "rustic" with some of the skin. Stir in the sugar to make a thick but pour-able glaze. If it seems too thick, stir in a bit more lemon juice or some milk.

Pour glaze over cake and let set 30 minutes before serving.

Optional replacements: any increment of vanilla extract, almond extract, bourbon and brandy to make 2.5 tsp total. Yogurt or buttermilk to replace sour cream or whole milk.

Thursday, September 24, 2020

Moelleux of Fruits (Almond Cake)


Take a look at this cake. It's so versatile. It was SO GOOD and SO EASY to put together. I was shocked at how good it was! Make it with whatever fruits you have in your refrigerator - the original recipe called for stone/summer fruits but I used the figs from our backyard. 


Just a disclaimer: figs release lots of syrupy juices. Do not crowd them. I did that with a tart and it looked gorgeous before baking ... but it came out a wet mess! I can't wait to try this with pears, peaches, nectarines, a handful of berries, etc. 

Feel free to make adjustments to the almond meal and flours. The original recipe called for 3/4 cup almond meal and 1/2 cup all-purpose flour but I ran out of almond meal ... and then I ran out of all-purpose flour ... so I made do with that I had. But the ratio was fantastic. The sugar on top created a nice caramelization on the top, esp at the edges of the cake.


Moelleux of Fruits (Almond Cake)
Adapted from David Lebovitz

6 figs (or other fruits; enough to half and slice into 3/4-1" thick wedges)
1/4 cup almond meal (I ground my own almonds - 1 cup almonds with 1 Tbsp sugar)
1/4 cup all-purpose flour
1/2 cup whole wheat flour
1 1/2 tsp baking powder
1 cup granulated sugar
4 ounces (1 stick) salted butter, at room temperature
2 large eggs, at room temperature
1 tsp vanilla extract (or 1/2 tsp almond extract)
1 Tbsp coarse granulated brown sugar, such as tubinado sugar (or in my case, three packages of Sugar in the Raw which I took from a coffee shop)

Preheat oven to 350 degrees F. Grease an 8-inch springform pan with butter or non-stick spray.

In a medium mixing bowl, stir together the different flours, baking powder and granulated sugar with a silicon spatula. Add the room temperature butter and mix it in with the spatula until it's broken up into little pieces and thoroughly mixed - it should look shaggy and kind of like wet sand with small bunched chunks in it. Stir in the eggs and vanilla extract. It's fine if there are small pieces of butter visible.

Pour the batter into the pan and smooth out the top with the silicon spatula. Arrange the fruit prettily on top of the cake - if using stone fruits or pears, place the wedges of fruit on their sides in concentric circles, snugly against each other. Press them gently into the batter, about 1/4 inch down. Avoid putting the fruits right up against the sides of the pan, to leave some room for the batter to rise.

Sprinkle the coarse sugar evenly over the top and bake until a toothpick inserted into the center should come out clean, approx 1 hour. Start checking around the 45 minute parm. Remove from the oven and set on a cooling rack. If any fruit juices have bubbled up and stuck to the sides of the pan, run a knife around the outside of the cake, which will help it release later.

After 15 minutes, then remove the springform portion while the cake is still warm.

Wednesday, December 12, 2018

Berry Buckle Cake


The cake you see above was made with fruit that would have been abandoned! And the thing I absolutely hate the most is wasting food (and cockroaches, but that's another story). There's something about wasting food that makes me angry. Maybe it's all the hungry people in the world or the thought of wasting hard-earned money.

In any case, we bought some blackberries at Sprouts and after one berry, M refused to eat any more because we didn't get a good batch - they were admittedly very sour. He wanted to trash them but I said "NO, I'll just turn it into cake!" So I used a recipe from Half Baked Harvest to make our blackberries edible again.


Berry Buckle Cake
Adapted from Half Baked Harvest
Serves 8

1 1/2 cups flour
2 tsp baking powder
1/2 tsp ground cinnamon
3/4 cup light brown sugar
1 stick salted butter, melted and cooled
2/3 cup whole milk
2 large eggs, lightly beaten
2 tsp vanilla extract
2 tsp lemon zest
2 clamshells/pints fresh blackberries (or any other berries, about 2 cups - I used two clamshells because I wanted to use the berries up and because blackberries are larger)

Topping:
1/2 cup flour
1/2 cup light brown sugar
1/2 tsp ground cinnamon
4 Tbsp salted butter, room temperature

Preheat oven to 350degreesF and spray a 9" spring form pan with nonstick cooking spray.

In a small bowl, gently combine berries and lemon zest.

In a large  bowl, whisk together the dry ingredients. Once thoroughly combined, add the butter, milk, eggs and vanilla. Mix just until combined, being careful not to over mix. Pour the batter into the prepared pan and top with the berry mixture in an even layer.

Make the crumble by whisking together the flour, light brown sugar and cinnamon in a bowl. Using your fingertips, work the butter into the dry ingredients until moistness is distributed and a crumbly mixture forms. Sprinkle the crumble evenly over the berries.

Bake for 45-55 minutes or until golden brown on top and a skewer comes out nearly clean. Let the cake cool and serve warm or at room temperature.

Wednesday, December 16, 2015

Nutella-Filled Brown Butter Pumpkin Chocolate Chip Cookies


Now, those cookies may not look like much from the outside. But on the inside (where it really matters, amirite?) there is a delicious, melt-y, chocolate-y NUTELLA center. And no one can resist nutella. Keep that in mind the next time someone approaches you at a bar. Get to know them. They may be filled with nutella too!


As part of the 2015 Great Food Blogger Cookie Swap, I baked the above cookie and sent them out to my three match-ups ... Lynsey Lou's, The Kitchen Adventurer and Recipe Runner. Hopefully the ladies enjoyed their cookies - and from the Instagram posts I got, I think they did! My coworkers also enjoyed the sample that I gave them so I'll need to bake more soon.

Every year, I participate in this cookie exchange as part of the holidays, but the great thing about it is that to participate, the swappers are asked to donate $4 and the proceeds to go Cookies for Kids' Cancer. In the last few years, we've raised over $7,000 with just this exchange during the holidays, in tandem with the brand partners (Dixie Crystals, Land O Lakes and OXO), who match all contributions 1:1. Not only that but they send us nifty little gifts for participating! This year I got a set of measuring beakers and a silicon baking mat - both super cool!

Definitely think of joining next year if you're also a blogger - it's fun and everything goes to a great cause!

Nutella-Filled Brown Butter Pumpkin Chocolate Chip Cookies
Adapted from Layers of Happiness

1 cup unsalted butter
1 1/4 cups packed dark brown sugar
1 large egg
1 egg yolk
1 tsp vanilla extract
2 1/2 cups all-purpose flour
1 1/4 tsp baking soda
1/2 tsp of salt
1/4 cup granulated sugar
1 1/2 tsp ground cinnamon
1/4 tsp ground nutmeg
1/4 tsp allspice
1/8 tsp ground cloves
4 Tbsp of pumpkin puree
1/2 cup semi-sweet chocolate chips
1/2 cup dark chocolate chips
Nutella (refrigerated)

First of all, refrigerate your nutella. I can't stress this enough. If I have an enemy, I'm just going to cover them in nutella and they'll go insane trying to get it off. IT GETS EVERYWHERE when it's at room temperature.

In a skillet (preferably not coated), melt butter over medium heat - stirring constantly. Once the butter begins to foam and has the aroma of a nutty flavor, remove it from the heat immediately or the butter will burn and that's no good for everyone. It will be slightly brown at the bottom of the pan. Set it aside and let it cool down.


In a medium bowl, combine the flour and baking soda, incorporating well.

In the bowl of an electric mixer, combine the cooled brown butter, salt and sugars, blending thoroughly. Add in the egg and egg yolk, pumpkin, spices and vanilla - mix well again. Turn down the mixer to the lowest speed and add the flour mixture slowly. Remove from the blender and fold in all the chocolate chips.

Chill dough for 2-3 hours to make it easier to work with. Preheat oven to 350degrees.

Measure out 1.5 tablespoons of dough out and smash it flat between your palms. Put a chunk of refrigerated nutella in the middle, then roll the rough around it and form a ball, sealing the nutella completely.

The best way to do this is to use two knives so your hands never touch the nutella. It helps if you have a sheet of Saran Wrap laid out and you can take out a few chunks at a time, and keep refrigerating the rest. Don't ever touch the nutella!!


Bake the cookies for 10 minutes or until they begin to turn brown. Don't worry if they look underdone in the middle - you don't want fully cooked nutella!

Thanks to the ladies of Ambrosia Baking for your chewy ginger molasses chews, The P.K.P. Way for your holidays spice coookies and a mystery sender that sent chocolate peppermint crunch cookies for my sweets - my coworkers and I enjoyed them immensely!!

Looking forward to the 2016 cookie swap!!

Wednesday, December 11, 2013

The Great Food Blogger Cookie Swap 2013 - Salty Chocolate Peanut Butter Cookies #fbcookieswap


My thirs year participating in The Great Food Blogger Cookie Swap! As always, it was stressful to think of what kind of cookie to bake. Will people like this?! is it flavorful enough? It is too flavorful? Is it too sweet?! What if they turn out gross? Are they going to judge me based on what kind of cookie I send them?! And on and on and on.


When you participate in the cookie swap, you are asked to donate $4 to Cookies For Kid's Cancer, a non-profit organization that benefits children with cancer. If that's not enough reason to donate, you also get goodies from the sponsors ... OXO, Dixie Crystals, Gold Medal and Grandma's Molasses. Yay for free stuff, yay for benefiting a great cause and yay for getting cookies in the mail from fellow food bloggers. Join next year if you can!

This year I settled on these Salty Peanut Butter Cookies. The recipe is so easy, you can mix it together by hand and it has no flour in it - perfect for those that need a gluten free diet . But definitely make it for anyone! Best with tea or coffee because these cookies are sweet sweet sweet.

Salty Peanut Butter Cookies
makes about 2 dozen cookies

1 cup creamy peanut butter (not "natural")
1 cup dark brown sugar
1/3 cup granulated sugar
1 egg
1 Tbsp vanilla extract
Pinch of sea salt or kosher salt
Good chocolate pieces (you can buy a bar and break off pieces)

Preheat oven to 350 degrees and line some baking sheets with parchment paper or aluminum foil.

Mix all the ingredients thoroughly in a large bowl, either by hand or with a stand mixer. Scoop out into balls the size of walnuts, top with a piece of chocolate (don't press down). I used milk chocolate pieces this time but have used "Lindt Dark Chocolate with A Touch of Sea Salt" with fantastic results.

Sprinkle with an additional smattering of sea salt or kosher salt and bake for 10-12 minutes. Cool in the tray for 5 minutes and then transfer to a wire rack to cool completely.


I also found these Gingerbread Twix at the market and bought them to include with the cookies sent out cause they looked so festive! These goodies were sent out to Christina (The Dough Will Rise Again), Kara (Kara in the Kitchen) and Laura (Momables) ... hope you ladies enjoyed!

Plus, I got these in the mail for myself ... perfect for my own cups of tea between international travelling!


Can't wait to participate next year ... and every single year after that! I'm so glad that I've been a part of this since Year One. And on top of that, this year the cause has raised over $13,500 this year. Thanks so much for organizing again, Lindsay and Julie!

Wednesday, December 12, 2012

The Great Food Blogger Cookie Swap 2012 - Bouchon Bakery’s ‘Nutter Butters’ #fbcookieswap

The Great Food Blogger Cookie Swap 2012


After participating in the #FBCookieSwap last year, there was no way that I was going to pass up the opportunity to participate again in it this year. Hosted by Lindsay at Love & Olive Oil and Julie at The Little Kitchen, dozens of bloggers in different countries participate to send cookies to each other for the holiday season. After receiving my matches, I send out a dozen cookies to each blogger. In return, I receive three one-dozen sets of cookies in the mail from other bloggers.


In order to participate in the exchange this year, we had to donate $4 to charity, which was a great idea. Signing up and paying via Paypal was easy, and in exchange, this adorable cookie spatula was sent to your house along with a thank you not for your donation.

It's been really fun getting boxes in the mail though I got them all practically on the same day. No spacing out this year! I wish it was a bit more staggered so I could have had a steady stream of cookies to eat but no fear ... you can never have too many cookies! And I received the following lovely cookies from the following lovely bloggers:


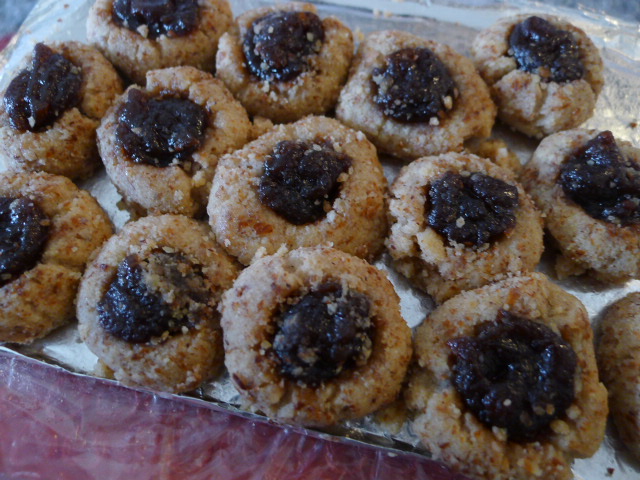
linzer thumbprint cookies with apple butter from Hannah

rosemary lemon cookies from Stacy


orange walnut waffle cookies / holiday popcorn w/ dark chocolate, white chocolate, pistachios and dried cranberries / peppermint bark from Liz

This year, I decided to do a recipe from Thomas Keller (who I also met earlier this week at a book signing ... EEP!! *clapping*). His fancy nutter butters had ... well, a ton of butter. But they were so good. At the book signing, they had these cookies to pass out so I was able to try his actual version (I hadn't tried it prior to the recipe) and ... well though I thought mine were delicious, they were nothing compared to his.

creaming of the butter and sugar. lots and lots of butter.

cream till fluffy

batter up!

cookies ready to be filled and sandwiched

tins of cookies ready to be sent out

Some of the cookies might not have had as much filling, so I'm very very sorry. Next time, I will have to double up on the filling so each one gets a good healthy dose. Ha, I said healthy. There is absolutely nothing healthy about these cookies. Hope you liked them Victoria, Beth and Diana!!

Bouchon Bakery’s ‘Nutter Butters’
makes about 3 dozen sandwiches

2 cups all-purpose flour
2 ttsp baking powder
4 tsp baking soda
1 lb (4 sticks) butter, room temperature
2/3 cup creamy peanut butter, preferably Skippy
1 cup granulated sugar
1 cup firmly packed light brown sugar
2 large eggs
1½ tsp vanilla extract
1/3 cups coarsely chopped peanuts
2½ cups quick-cooking oats

Cookie Filling:
¼ lb (1 stick) butter, room temperature
½ cup creamy peanut butter, preferably Skippy
1 2/3 cups confectioners’ sugar

Preheat oven to 350degreesF. In a bowl, mix together the flour, baking powder and baking soda; set aside. Using a mixer with a paddle attachment, cream together the butter and peanut butter. Add sugars and beat at medium speed for 4 minutes, scraping down bowl twice.

At low speed, add eggs and vanilla. Add flour mixture and beat at low speed until well mixed, frequently scraping down bowl. Add peanuts and oats, and mix well. Using an ice cream scoop 1 1/4 inches in diameter, place balls of dough on parchment-lined baking sheets at least three inches apart.

Bake until cookies have spread and turned very light golden brown, about 10 minutes. Remove from oven and set aside to cool and firm up, 5 to 10 minutes. Transfer to a rack to cool completely before filling.

To make the filling, with an electric mixer, cream together the butter, peanut butter and confectioners’ sugar until very smooth. Spread a thin layer (about 1/8 inch) on underside of a cookie. Sandwich with another cookie. Repeat until all cookies are sandwiches and start eating!

Wednesday, August 22, 2012

Chocolate Chip Cookies by Jacque Torres


I seldom get so excited about something that I blog immediately, but this is one of those events. With the exception of Urasawa. But then again, Urasawa is the exception to everything. Both my friend Susie and Miss food, je t'aime raved about these cookies. Though it must be noted that Christina raved about them because she made them and ate them, and Susie raved about them because she saw pictures on Pintrest and thought they looked delicious.

I have dinner tomorrow at my co-worker Sona's house and my Asset Manager is going to be there. I thought it would be the perfect time to break out the cookie batter and see if it lived up to the hype. The very first time I met my Asset Manager was right after I took macaron classes, so I had brought vanilla macarons with salted caramel ganache into the office and it was love at first bite for him. He went nutso and from that point on, every time he came into the Los Angeles offices, he would ask if I baked anything. Last time he asked me right when I sat down in his office for my review! Needless to say, I hadn't (sad face) but that didn't stop him from giving me a good review anyways (relieved face).

I thought it would be the perfect time to break out the cookie batter and see if it lived up to the hype. Jacque Torres is a chocolate master and these cookies really show his skill, especially with the combination of flours. Luckily, I had both kinds of flours on hand so I didn't have to break the bank buying them along with the chocolate, which already cost me a pretty penny.


Chocolate Chip Cookies with Sea Salt
adapted from food, je'taime and Jacques Torres
makes 18 5-inch cookies

2 cups minus 2 Tbps (8.5 oz) cake flour
1 2/3 cup (8.5 oz) bread flour
1 1/4 tsp baking soda
1 1/2 tsp baking powder
1 1/2 tsp coarse salt (kosher or sea)
2 1/2 sticks (1 1/2 cups) unsalted butter
1 1/4 cups (10 oz) light/golden brown sugar
1 cup plus 2 Tbps (8 oz) granuldated sugar
2 large eggs
2 tsp vanilla extract
1 1/4 lbs chocolate disks/fèves (at least 60% cacao)
Sea salt, for sprinkling

Sift flours, baking soda, baking powder and salt into a bowl. Set aside.

Using a mixer fitted with paddle attachment, cream butter and sugars together until very light, about 5 minutes. Add eggs, one at a time, mixing well after each addition. Stir in the vanilla. Reduce speed to low, add dry ingredients and mix until just combined, 5 to 10 seconds. Drop chocolate pieces in and incorporate them without breaking them. Press plastic wrap against dough and refrigerate for 24 to 36 hours. Dough may be used in batches, and can be refrigerated for up to 72 hours.

When ready to bake, preheat oven to 350degrees. Remove cookies from refrigerator and let them come to room temperature. Line a couple baking sheets with parchment paper or a nonstick baking mat. Set aside.

Scoop 6 3 1/2-ounce mounds of dough (the size of generous golf balls) onto baking sheet, making sure to turn horizontally any chocolate pieces that are poking up; it will make for a more attractive cookie. Sprinkle lightly with sea salt and bake until golden brown but still soft, 18 to 20 minutes. Transfer sheet to a wire rack for 10 minutes, then slip cookies onto another rack to cool a bit more. Repeat with remaining dough, or reserve dough, refrigerated, for baking remaining batches the next day. Eat warm, with a big napkin.


I made some changes, as Christina suggested - baked the cookies in 2 oz portions so they wouldn't be too unwieldly and refrigerate the dough for the full 72 hours. These cookies were a pain to make, but don't let this deter you. I think they were more of a pain for me because I'm OCD. I actually weighed out each scoop of 2 oz dough so all the cookies would be a uniform size. Do you know how weird it is to be picking out 0.05 oz of dough to get it perfectly even? Since the cookies were smaller, I was able to make 33 cookies total. It took them 17 minutes to bake, but start checking at the 15 minute mark as it may depend on how much your dough has defrosted from being refrigerated.

One bite and it was totally worth it! Oh yes, and here's to you, Susie. You're pregnant and taking care of your baby Riley and you totally deserve each bite. Adhere to the note: none for your husband.

Wednesday, February 29, 2012

The Walking Dead S2E10 - Blueberry Pie


The first episode of The Walking Dead after the mid-season hiatus was a bit slow, and people were disappointed. However, I don't think the show is about nothing but gore, violence, and zombie attacks ... though there are plenty of those elements as well. Maybe I'm wrong, but I think the post-apocalyptic world brings out the person you really are - whether that's maternal, selfish, violent, etc. I'm sure Shane did portray himself the way he does now when he was a cop with Rick before the invasion started, but look at him now. And Andrea! Don't even get me started on that psycho, selfish, stupid bitch.

I had a lot of blueberries in the fridge so I decided to make a blueberry pie! For several different reasons: (1) blueberry filling looks pulp-y and gore-y; (2) they were on sale at the market a week or so back and I went a little overboard in "stocking up" on them; (3) I've never baked a fruit pie before and I know Boyfriend enjoys pie a lot.


Look, instead of a lattice-top pie crust, I covered it with hearts! I felt it was very creative on my part and was very pretty. I hope Boyfriend was super impressed. He ate 1/3 of the pie straight off, even though I recommended that it cool down for a few hours first. I think he waited about 45 minutes. I'm kinda proud of myself. But dinner was not just blueberry pie ... there was also ginger soy chicken thighs and cumin-scented roasted carrots.

Ginger-Soy Chicken Thighs
from myrecipes.com

1 Tbps olive oil
6-8 skinless, boneless chicken thighs
1/2 cup ginger preserves
2 Tbps low-sodium soy sauce
2 garlic cloves, minced

Heat a large skillet over medium-high heat. Add oil to pan; swirl to coat. Add chicken and cook 5-7 minutes on each side or until done. Remove from pan; keep warm. Add preserves, soy sauce, and garlic to pan; turn off the heat. Bring to a boil (it'll only take a few seconds) and stir to combine. Return chicken to pan and turn to coat with sauce. Serve over rice, making sure to get some sauce with the chicken to mix in with the rice.

** You can find ginger preserves in the English foods section of the grocery store.


Blueberry Pie
adapted from various sources

1 9-inch pie crust
3 cups fresh blueberries
2 Tbps cornstarch
1/2 cup sugar
2 Tbps lemon juice
2 tsp lemon zest
1/2 tsp cinnamon
1 egg
1 Tbsp cream or milk

Preheat oven to 425F. Place bottom crust within the pie tin and trim to fit. Mix blueberries, cornstarch, sugar, lemon juice and zest together thoroughly in a large bowl and fill in the crust. Beat together the egg and milk. Brush the sides of the crust with the egg wash.

Cut shapes out into the top crust, whether in hearts, stars, or whatever cookie cutter shape you have. Lay them over the blueberries, making sure the pieces overlap slightly (so they stick together during baking), making sure you can see bits of the blueberry filling underneath. This way the pie can steam. Cover the top with egg wash, making sure it doesn't pool into puddles.

Let pie chill in refrigerator for 30 minutes, then remove and place on a baking sheet lined with parchment paper, to catch any fillings that may bubble over. Bake for 20 minutes, then lower heat to 350F and bake for another 35-40 minutes, until the top is a deep golden brown and the filling is thick. Cool on a wire rack for 3-4 hours before cutting/eating, to let the flavors meld together.

Between the chicken, carrots, rice and blueberry pie it was a very well-rounded meal. And we watched BOTH the Oscars and the Walking Dead - thank god for having TV on Eastern time. Didn't feel like watching Comic Book Men though; I think we're over that show.

Friday, February 17, 2012

Lemon Yogurt Cake


Winter is the time for cirtus ... oranges, lemons, meyer lemons, grapefruit, pomelos ... there are a variety of options. However, my favorite is still lemon cake. Actually lemon meringue pie (without the meringue part) is good too, but most of the time there is a TON of sugar in it and that doesn't appeal to me as much.

Strangely, I never used to like lemon desserts of any kind. They say your taste buds change every seven (or was it ten) years, and suddenly you start loving foods that you used to hate, etc. This must be true, because the past year or so I've started to dislike tomatoes in raw/salad format, when I used to really like them before. Strange.

Anyway make this cake if you have any lemons sitting around, you won't regret it. I took some over to Susie's while visiting her adorable baby and she couldn't stop eating it (Susie, not the baby). If you have some meyer lemons, definitely substitute it in! I did and it was amazing ...


Lemon Yogurt Cake
adapted from Ina Garten

1 1/2 cups all-purpose flour
2 tsp baking powder
1/2 tsp kosher salt
1 cup plain yogurt (I used Greek)
1 1/3 cups sugar, divided
3 eggs
Grated lemon zest from 2 lemons (regular or Meyer)
1/2 tsp vanilla extract
1/2 cup grapeseed oil (or other neutral oil)
1/3 cup freshly squeezed lemon juice

Preheat the oven to 350F. Grease and flour a loaf pan.

Sift together the flour, baking powder, and salt into 1 bowl. In another bowl, whisk together the yogurt, 1 cup sugar, the eggs, lemon zest, and vanilla. Slowly whisk the dry ingredients into the wet ingredients. With a rubber spatula, fold the grapeseed oil into the batter, making sure it’s all incorporated. Pour the batter into the prepared pan and bake for about 50 minutes, or until a cake tester placed in the center of the loaf comes out clean.

Meanwhile, cook the 1/3 cup lemon juice and remaining 1/3 cup sugar in a small pan until the sugar dissolves and the mixture is clear. Set aside.

When the cake is done, allow it to cool in the pan for 10 minutes. Take a fork and prick holes all over the cake and then pour the lemon-sugar mixture over the cake and allow it to soak in for five minutes. Invert the cake out into a plate and let it cool.